Post by Darkson on Jul 13, 2007 20:48:50 GMT -5
[glow=red,2,300]A great tutorial on basing:[/glow]
Painting of a concrete base of Steampunk style
This base accompanying a Steampunk figurine, in fact the widowmaker from Privater Press, I sought to give him some elements characteristic of the kind, such as the rivets, and the stains in the shape of run-outs.
The base is carried out in milliput, the metal reinforcements with a Evergreen section in corner, and the rivets with of Duro, the ground is in pollyfilla stops wood.
1 Underlayer in black with bomb GW, in 2 times, to wait well until painting is dry before passing at the following stage.

2 Brushing in codex grey, with a brush punt Prince August cuts 6 in synthetic hair, you can support brushing, because here one seeks to give a basic color while creating a grain to imitate the concrete.

3 One continues to brush with white and bleached bone
in the codex grey, it is important not to dilute painting for brushing, like working with a quite dry brush, under penalty of having unpleasant trails.

4 The metal reinforcements are painted with a green blade, here of the German uniform from Andrea Color(ref 1 field grey).
I benefit this stage from it to tint the ground with a quite thick juice of smoke (patina chestnut) of in Prince August(ref 939), but of chestnut and the black in varnish can just as easily make the deal.

5 One passes a juice of German uniform with noir/bestial to 50/50, that goes given a similar color to oxidized bronze, then stop them are taken again with white in the base, just as the rivets.

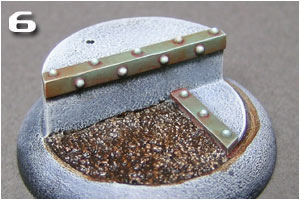
6 Of rust is realized with dark flesh, and bestial brown in glacis, not to have the too heavy hand.
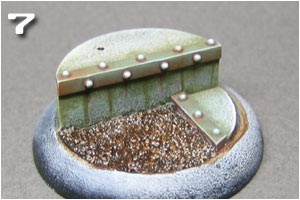
7 The concrete is still too blade, actually because of moisture, foam will come to colour that-ci.Différent glacis bestial, green catachan, green goblin/bestial, or dark flesh will tint the concrete, I could only too much advise to have visual references, like photographs of old bunker or factories, that is without too much sorrow on the Net.
8 To finish, I passed by again a little varnished shining with black ink on the ground, to give the impression of a softened muddy water ground, then I have simply repaints the edge of the base in black.
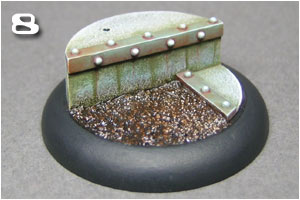
It does not remain any more which the figurine finished on the base has to fix.Time of realization, approximately 20 minutes.
[glow=green,2,300]And another sweet base:[/glow]
Creation of a base in plastic chart and painting using liquid masking
Although the painting of a figurine is important, it is often the base which places this one in a place and a particular environment, the same painting on a simple varnished piece of wood or on a base more worked makes all the difference by telling a history, or rather by leaving the person who looks at your work making her own history.
This base accompanies a very dark figurine, which I saw well grinding in a sewer or a hurdy-gurdy machines unused in the search of enemies or simply of old rats with griller…
To build this base you will need plastic chart different thickness and plastic sections. The most known marks are EVERGREEN and PLASTRUCT.
1 the base of the base, a simple cube out of wooden of 3 cm dimensioned, "borrowed" from the building set of my son; -)

2 Construction of a formwork in 0,5 mm thickness plastic chart. For the work of the plastic I always use adhesive TAMIYA Extra Thin, which contrary to the cyano soda literally the plastic and makes joining very solid.

3 Plate of figure textured way hones sold in the shops of railway model making.

4 Construction of one limps returning perfectly in the formwork carried out previously, do not hesitate to make dummy trials so that very adjusts itself perfectly.

5 the interior is reinforced by a piece of chart plastic which acts as beam.

6 Here what up to now the base resembles.

7 A second piece is placed perpendicularly with the first, and comes to reinforce the back of limps for the following stage.

8 I run resin polyurethane (G26/27) to the brim, to fill the base. Indeed as I will put a stem in the foot of the figurine, this one would find only the vacuum if the base were not filled. This operation also makes it possible to weigh down the base and to lower its centre of gravity thus to make it more stable. One can also use milliput, or even plastiroc, in short anything which can fill and harden with the final one.

9 With a piece of bunch of model I carry out pipes quickly bent. Better is worth to look with twice before throwing the useless bunches with the dustbin, certain forms make pretty pipes.

10 I add details, with a plastic section in L I makes the corners of the base and the edge of the stone wall, and the rivets are made with the punch&die or other.

11 Addition of a granulous texture with diluted putty TAMIYA with solvent for nail, and to tap with an old brush brushes.

12 Here what the higher part of the base resembles finished once.

13 TAMIYA PUTTY which was used to make texture, this kind of cement is diluted with acetone or better with solvent with nail varnish (since the women put themselves of it on the fingers it is that that must be less harmful).

14 base monté…

15 And dismounted.

In the remainder of this tuto I use an aerographer to paint, if you do not have this tool not problem, one can make painting with the brush or with paint sprays, only the principle of masking is important. It is just necessary to work with fine layers, therefore to dilute painting well.
16 Pennies sleep in black with the bomb Citadel, I inserted without sticking them two brass stems in the holes which will come to receive the stems of fixing of the figurine.

17 Elements are still not stuck, and even once painting dries one can detach them, to work in subsets makes it possible to facilitate the work of painting.

18 Painting with the aerographer with a mixture of red, dark flesh, and black.

19 Masking of the edge with Scotch tape TAMIYA, very good quality it does not tear off at all the painting, even finest.

20 I pass then a mixture of the basic color with in more of the scorched brown and more black

21 Some orange keys come to bring nuance.

22 One cut out a small piece of Scotch tape brit…

23 And one make use of it like plug to tap surface with a liquid of masking, here of Mr. Neo Masking, but Maskol or of liquid latex make the deal as well.
One insists especially on the edges and the corners.

24 Once dryness one passes from the catachan green over the whole, in the hollows a mixture of catachan + black.

25 One cuts out a star in a piece of Post It, one uses biensûr the sticking part.
Post It make very good masks, because they stick just what it is necessary, and one can re-use them several times.

26 One passes a blow of white broken, if you do not have an aerographer a blow of bomb of white underlayer makes the deal, in any event one will pass a washing over later. It is necessary just that the mask protége better the remainder, because the jet of painting is less precise and broader.

27 One withdraws the liquid of masking with Scotch tape repositionnable, normally Ca comes alone while rubbing a little. The scales of rust appear finally!

28 the wall is painted to him with mixture of codex grey, shadow grey and catachan green, brushed dry with codex grey and bleached bone, bottom is worked with washings of camo green and yellow.
One can finally stick the 2 parts, one finicks with different glacis from bestial brown and dark flesh for rust, of various greens and gray for the wall.

29 To finish I ran a gel imitating the water of the mark ROCH, it is a resin with 2 components which once mixed with 50/50 hardens in 24 hours. I mixed a little pigment out of powder maroon and green to disturb the liquid and to give the impression of vase and stagnant water. The part out of wood is varnished with of waxed V33 color ebony.

Both of these can be found in their orignal language at:
neomodel.free.fr/index02.html
Painting of a concrete base of Steampunk style
This base accompanying a Steampunk figurine, in fact the widowmaker from Privater Press, I sought to give him some elements characteristic of the kind, such as the rivets, and the stains in the shape of run-outs.
The base is carried out in milliput, the metal reinforcements with a Evergreen section in corner, and the rivets with of Duro, the ground is in pollyfilla stops wood.
1 Underlayer in black with bomb GW, in 2 times, to wait well until painting is dry before passing at the following stage.
2 Brushing in codex grey, with a brush punt Prince August cuts 6 in synthetic hair, you can support brushing, because here one seeks to give a basic color while creating a grain to imitate the concrete.
3 One continues to brush with white and bleached bone
in the codex grey, it is important not to dilute painting for brushing, like working with a quite dry brush, under penalty of having unpleasant trails.
4 The metal reinforcements are painted with a green blade, here of the German uniform from Andrea Color(ref 1 field grey).
I benefit this stage from it to tint the ground with a quite thick juice of smoke (patina chestnut) of in Prince August(ref 939), but of chestnut and the black in varnish can just as easily make the deal.
5 One passes a juice of German uniform with noir/bestial to 50/50, that goes given a similar color to oxidized bronze, then stop them are taken again with white in the base, just as the rivets.
6 Of rust is realized with dark flesh, and bestial brown in glacis, not to have the too heavy hand.
7 The concrete is still too blade, actually because of moisture, foam will come to colour that-ci.Différent glacis bestial, green catachan, green goblin/bestial, or dark flesh will tint the concrete, I could only too much advise to have visual references, like photographs of old bunker or factories, that is without too much sorrow on the Net.
8 To finish, I passed by again a little varnished shining with black ink on the ground, to give the impression of a softened muddy water ground, then I have simply repaints the edge of the base in black.
It does not remain any more which the figurine finished on the base has to fix.Time of realization, approximately 20 minutes.
[glow=green,2,300]And another sweet base:[/glow]
Creation of a base in plastic chart and painting using liquid masking
Although the painting of a figurine is important, it is often the base which places this one in a place and a particular environment, the same painting on a simple varnished piece of wood or on a base more worked makes all the difference by telling a history, or rather by leaving the person who looks at your work making her own history.
This base accompanies a very dark figurine, which I saw well grinding in a sewer or a hurdy-gurdy machines unused in the search of enemies or simply of old rats with griller…
To build this base you will need plastic chart different thickness and plastic sections. The most known marks are EVERGREEN and PLASTRUCT.
1 the base of the base, a simple cube out of wooden of 3 cm dimensioned, "borrowed" from the building set of my son; -)
2 Construction of a formwork in 0,5 mm thickness plastic chart. For the work of the plastic I always use adhesive TAMIYA Extra Thin, which contrary to the cyano soda literally the plastic and makes joining very solid.
3 Plate of figure textured way hones sold in the shops of railway model making.
4 Construction of one limps returning perfectly in the formwork carried out previously, do not hesitate to make dummy trials so that very adjusts itself perfectly.
5 the interior is reinforced by a piece of chart plastic which acts as beam.
6 Here what up to now the base resembles.
7 A second piece is placed perpendicularly with the first, and comes to reinforce the back of limps for the following stage.
8 I run resin polyurethane (G26/27) to the brim, to fill the base. Indeed as I will put a stem in the foot of the figurine, this one would find only the vacuum if the base were not filled. This operation also makes it possible to weigh down the base and to lower its centre of gravity thus to make it more stable. One can also use milliput, or even plastiroc, in short anything which can fill and harden with the final one.
9 With a piece of bunch of model I carry out pipes quickly bent. Better is worth to look with twice before throwing the useless bunches with the dustbin, certain forms make pretty pipes.
10 I add details, with a plastic section in L I makes the corners of the base and the edge of the stone wall, and the rivets are made with the punch&die or other.
11 Addition of a granulous texture with diluted putty TAMIYA with solvent for nail, and to tap with an old brush brushes.
12 Here what the higher part of the base resembles finished once.
13 TAMIYA PUTTY which was used to make texture, this kind of cement is diluted with acetone or better with solvent with nail varnish (since the women put themselves of it on the fingers it is that that must be less harmful).
14 base monté…
15 And dismounted.
In the remainder of this tuto I use an aerographer to paint, if you do not have this tool not problem, one can make painting with the brush or with paint sprays, only the principle of masking is important. It is just necessary to work with fine layers, therefore to dilute painting well.
16 Pennies sleep in black with the bomb Citadel, I inserted without sticking them two brass stems in the holes which will come to receive the stems of fixing of the figurine.
17 Elements are still not stuck, and even once painting dries one can detach them, to work in subsets makes it possible to facilitate the work of painting.
18 Painting with the aerographer with a mixture of red, dark flesh, and black.
19 Masking of the edge with Scotch tape TAMIYA, very good quality it does not tear off at all the painting, even finest.
20 I pass then a mixture of the basic color with in more of the scorched brown and more black
21 Some orange keys come to bring nuance.
22 One cut out a small piece of Scotch tape brit…
23 And one make use of it like plug to tap surface with a liquid of masking, here of Mr. Neo Masking, but Maskol or of liquid latex make the deal as well.
One insists especially on the edges and the corners.
24 Once dryness one passes from the catachan green over the whole, in the hollows a mixture of catachan + black.
25 One cuts out a star in a piece of Post It, one uses biensûr the sticking part.
Post It make very good masks, because they stick just what it is necessary, and one can re-use them several times.
26 One passes a blow of white broken, if you do not have an aerographer a blow of bomb of white underlayer makes the deal, in any event one will pass a washing over later. It is necessary just that the mask protége better the remainder, because the jet of painting is less precise and broader.
27 One withdraws the liquid of masking with Scotch tape repositionnable, normally Ca comes alone while rubbing a little. The scales of rust appear finally!
28 the wall is painted to him with mixture of codex grey, shadow grey and catachan green, brushed dry with codex grey and bleached bone, bottom is worked with washings of camo green and yellow.
One can finally stick the 2 parts, one finicks with different glacis from bestial brown and dark flesh for rust, of various greens and gray for the wall.
29 To finish I ran a gel imitating the water of the mark ROCH, it is a resin with 2 components which once mixed with 50/50 hardens in 24 hours. I mixed a little pigment out of powder maroon and green to disturb the liquid and to give the impression of vase and stagnant water. The part out of wood is varnished with of waxed V33 color ebony.
Both of these can be found in their orignal language at:
neomodel.free.fr/index02.html